

Saturday, February 11, 2017
Nevertheless, She Persisted--FREE printable postcard
Here is a free, printable postcard to help with your civic communication. You can download a high resolution copy HERE.

Monday, December 9, 2013
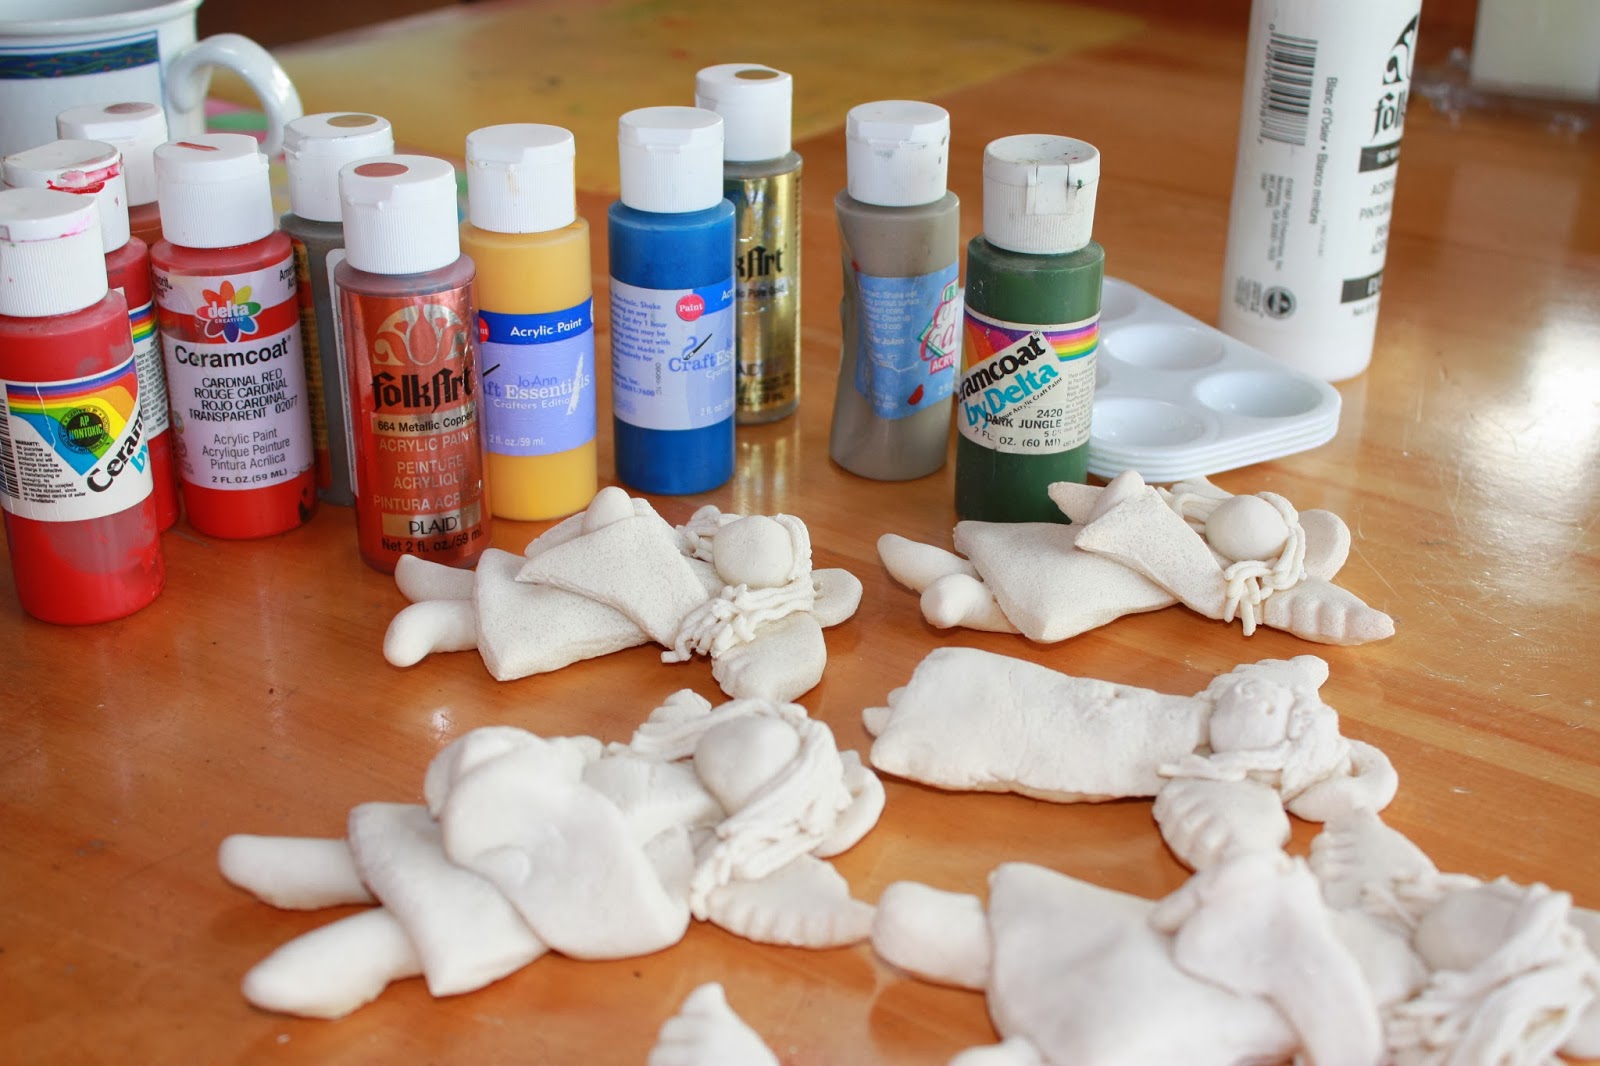
How To: Salt Dough Angels

When I was little, my Mom and I used to make salt dough ornaments for our Christmas tree. I made more when I went away to college, then again when I had a house and tree of my own as an adult. This year, my kids and I made more salt dough angels together. This is how we did it...
Here is a pdf file with the template we used for the cut-out portions of the angel pattern. It includes the dress, wings and halo. The head, legs and hands can be rolled and shaped free-form.
First, cut out the various parts of the template.

Then roll out your salt dough so that it's about 1/8-1/4 inch thick. We used a proportion of 2 parts flour to 1 part salt and 1 part water. We put parchment paper down on the table to keep things clean and make the rolling easier.

Next, cut out the dress body, dress arms, wings and halo using a tool with a thin edge (like a butter knife).


It's hard to be very precise when cutting out the "feather" detail on the wings, so we went back over them with a toothpick to shape them more.

To make the angels look more 3-dimensional, we added an actual body underneath the clothes, like this. Then we placed the dress body and sleeves on top.


The sleeves get folded over and a small oval ball of dough becomes the folded hands and helps hold the sleeves in place.


The part my kids liked doing best was adding the hair. We used a garlic press to squeeze out long strands of salt dough, then used toothpicks to shape them around the head, which is the last part to be added. It's also a good idea at this point to poke a hole or two in the place where you plan to hang a string from. We poked two holes in the halo to run string through later.

Here's my 11 year old daughter's angel.

And my 7 year old daughter's...

We put them all in the oven on a low temperature (275 degrees) for 60 minutes, or so, to dry them out.

After they are completely dry and cool, they can be painted. It's a good idea to seal them with some sort of spray varnish after they are decorated, since this keeps additional moisture from penetrating the dough and making them soggy.
Voila!


Sunday, November 3, 2013
Winter Solstice Soap
In all the mad hurrying and scurrying to get ready for the holiday sales season, I made a blunder on one batch of soap. I accidentally added the essential oils from two different varieties to the same batch. Happily, it turned out to be a lovely mistake. It's a little like those old Reese's Peanut Butter Cup commercials from the 1980s where two people run into each other on the sidewalk and chocolate and peanut butter collide...a wonderful accident.

Winter Solstice Soap is made with honey, beeswax and the oils of frankincense, myrrh, clove and orange. It's warm and spicy and sweet, all at the same time. It's a perfect winter scent.
I wanted to choose label art for it that made folks think of the cozy glow of candles in the long, dark winter. I chose today (Daylight Savings Day) to make it available because I think there's lots to love in this stretch of time until the Winter Solstice on December 21st. The darkness of the longest night is always lifted by candlelight.
 |
| Thanks to the Graphics Fairy for this great image. |
Each bar is individually wrapped and labeled for gift-giving. There is only one batch, so don't miss out!

Wednesday, August 28, 2013
How To: Fabric Tape
My crafty friend Britt (who also happens to be a fledgling beekeeper), came up with this great DIY project when she needed some decoration for her lovely honey jars. Then she was kind enough to let me post the tutorial here on Skruben! Here's how she did it...

I needed to secure the lids on my 2oz honey jars (they only screw on about 1/16 of a turn) and thought about Japanese Washi paper tape, but thought fabric tape might be more fun. I'm not the first to make it (or to do a how-to) but this is the first I saw with just the regular clear tape.

Pick a fabric. Small prints and solids make the prettiest tapes. Fat quarters and even scraps work fine.

If you're going to use the tape immediately, standard double-sided tape is great. If you want to make it ahead, use something like this double sided tape with the protective backing on so you can store it.

Apply your tape. If you have a pattern to work with, clear tape is great here because you see through to check your alignment.

You could use scissors to cut out your tape, but a rotary cutter, straight edge and mat allow for the cleanest cuts.

Voila! Cut your tape to the required size.

An angled edge adds interest.

Beautiful!
Monday, June 3, 2013
Bloomin' Chicken Coop

You may remember that I posted few weeks ago about our venture into urban chicken raising and the cute little puffballs that got us to finally commit. Well, they've been living in a crate in my office since then, growing like crazy, and stinking to high heaven.

We've been very busy trying to get a coop built for them outside and I'm happy to report that it's finally done!
We studied lots and got ideas from a great website called Backyard Chickens. Many of the ideas and practical details for our coop came from others that we saw on this site. The following is a step-by-step summary of what we did:

First we decided where to place the coop, which is under a huge rhododendron bush (almost a tree) in the back corner of our yard. It gets sun and shade at just the right times of day. We plotted out the space and dug a trench just slightly larger than the perimeter of the coop.
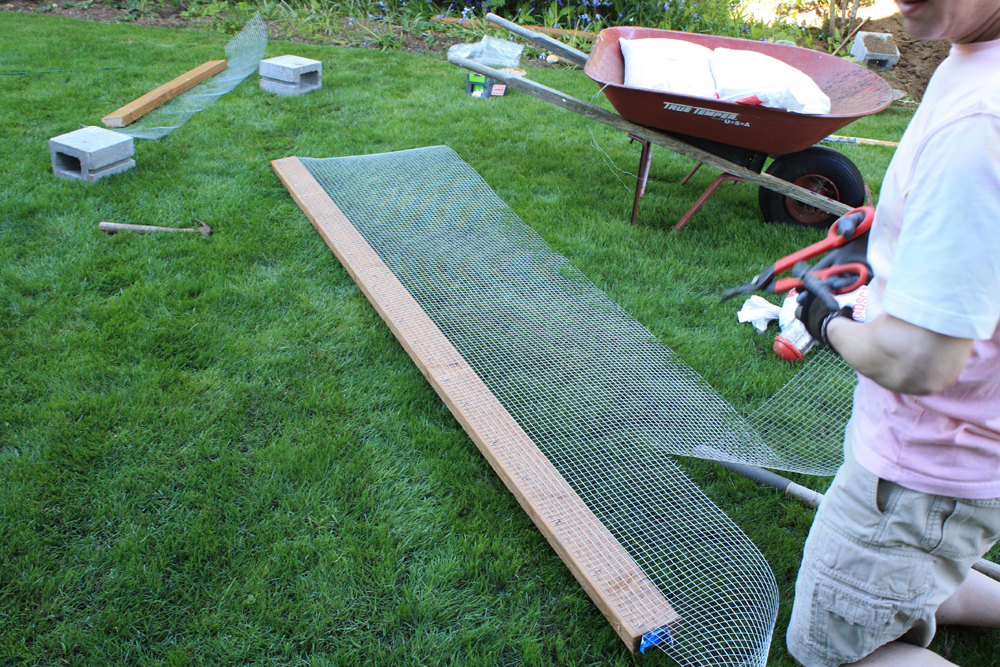
We used treated wood and cinderblocks for the foundation. We attached galvanized wire mesh to each of the four base boards.

We set the treated boards on top of the cinderblocks and leveled everything with the help of pea gravel. The wire mesh looks sort of like a bedskirt that surrounds the foundation, under the soil. It keeps predators and pests like raccoons and rats from being able to dig under the coop and get to the chickens or the eggs. We also tossed a goodly amount of pea gravel in around the base to help keep any diggers out.
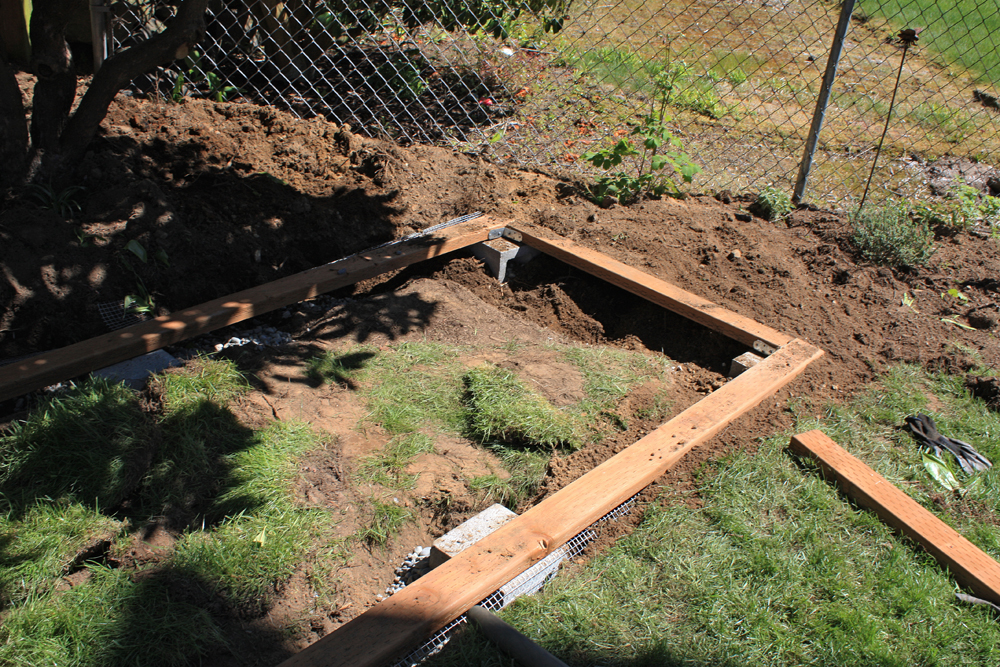
Then we filled in the soil all around and leveled the ground that was inside of the coop foundation boards. This made a nice even, clean surface for us to fill later with bark and wood chips.

Next I kept a hose running over the whole thing to make it nice and muddy. This allowed me to continue squishing soil down into all the cracks and crevasses and pack everything in tight. I did this whole bit barefoot. It was pretty fun, actually.

Now we could get started on the framing. My husband built each of the four sections separately and attached the wire mesh while they were lying flat on the ground. I think this was much easier than trying to do it after they went up. The one thing we regret was that we didn't do the wood staining before the mesh went on. That became a lot harder to do later and doesn't look as clean as we would like, but oh well. These aren't royal chickens or anything.

We decided to use metal brackets for many of the joints. This was partially because it's easy, and partially because we really liked the way it looked with a mixture of wood and metal together. It cost us more, but I suspect this may be the only chicken coop we'll ever build, so the splurge was OK with us.

Here's a picture of all four walls framed. Next came the floor for the interior portion of the coop, followed by the solid walls that enclose the roost and nesting area.

We added the pass-through doorway and some ventilation holes on the back side. Those holes were later covered with wire mesh.

This shows the nesting boxes that hang off the back end. We later added trim on the inside so that the chickens have to jump over a little ledge to get into their egg-laying space. Apparently they like it dark and cozy and separate from the rest of the coop area.

By this time in the process they were getting quite large. Did I mention that they smell bad? Sheesh. I needed them out of the house in a bad way.

Here you can see the finished front with both doors and a window, which is covered with wire mesh. I read that chickens need lots of ventilation because they produce a ridiculous amount of ammonia gas. No kidding!

Let me just go on public record here and say that my husband's carpentry skills impressed me quite a bit during this project. We had a great time working together. The kids were a help too.

The doors swing beautifully and the whole thing is incredibly solid. Nothing cattywampus here!

The last steps were to add the galvanized metal roofing and a nipple-watering system underneath in the walking area, then stain the whole thing.
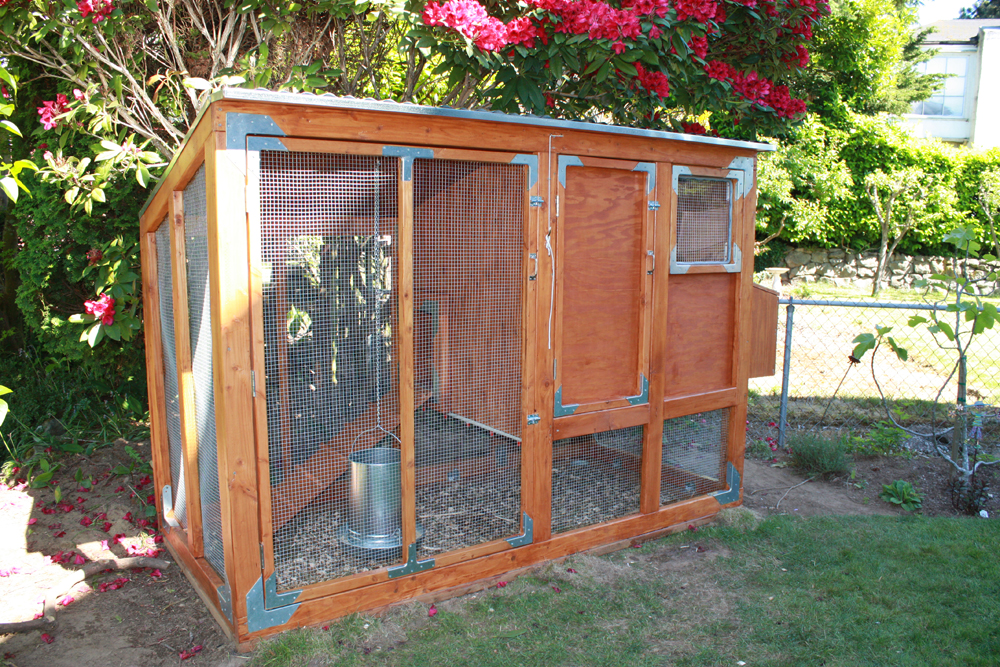
Viola!


You can see the little pull string attached to the pass-through door. We can easily open and close it from outside the coop this way.

You might also be able to see in this picture that we have a piece of plexiglass with a foam "bumper" hot-glued on around its edge. This can be slipped into the window opening if the temperature is too low, but still lets in light.

All we have to do to gather eggs is lift the nesting box lid and reach inside. That strange edge detail was the result of trying to use some scrap wood, not some other practical purpose. Maybe the hens will be able to visit through the opening while they're busy laying though. I bet chicken chatter increases egg productivity.


I think they like it!
Subscribe to:
Posts (Atom)